Wednesday, March 24, 2010

Two Lace Edgings of Mlle. R. de B.

I was having trouble seeing what was going on in a couple of these edgings from the spring/summer Knitty, so I made swatches (and had some fairly extensive nerdy thoughts, which I will share with you shortly). The yarn is a slightly hairy and not particularly glossy 2/30 silk/wool that obediently stays put once you block it; I used 2.25mm needles to make the fabric solid enough that I could see the motifs outlined clearly. I picked dark grey to make outlines that are maximally obvious against a white background (wrinkly linen handkerchief).

edgings together

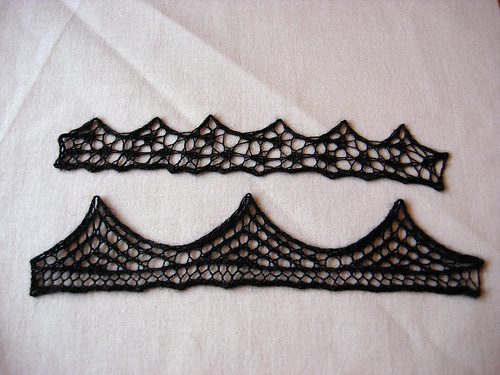
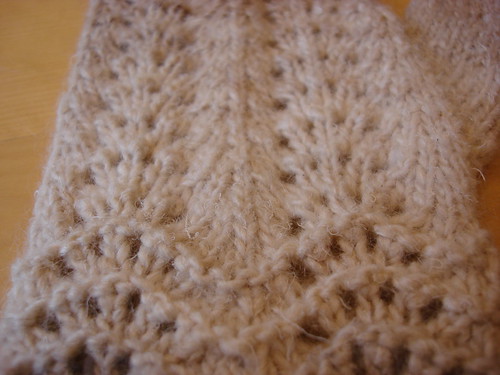
The treble diamond edging (top) is totally charming, now that I can see that there really are three tiny diamonds in there. It's a bit strange to knit; I was starting to get the hang of it here, but I think it would take a few more repeats before I wouldn't have to look at the chart all the time anymore.

treble diamond

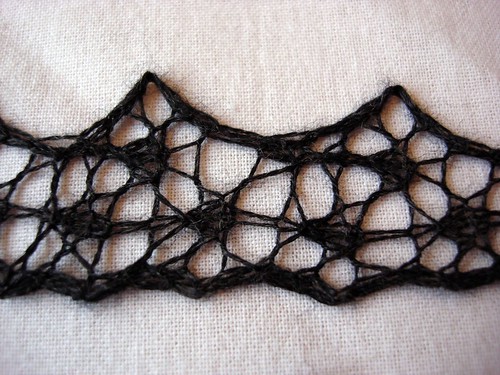
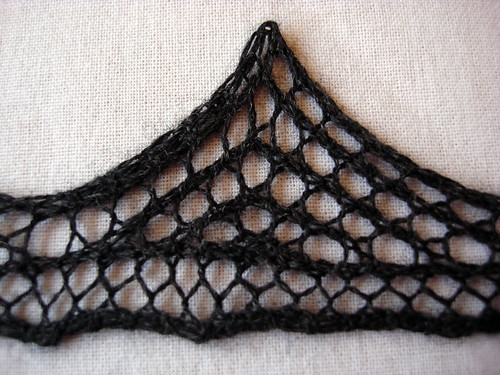
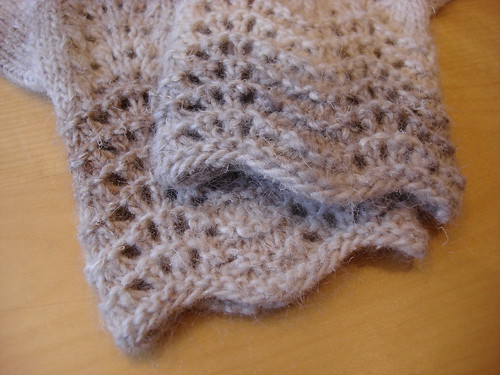
I only made one small change, which was to add a yo-k2tog at the beginning of every even-numbered row on the scallop edging (bottom). It was the only one out of the three that didn't have that lacy edge written into the pattern. I did this for two reasons: first because the poor edging looked a little bare without it beside the other swatch, and second because I find this makes a stretchier edge that's easier to block into big swoopy scallops than a plain garter edge. I'm sort of enamoured of this edging, actually! I like the contrast between the faggoting along the straight edge and the eyelets in the scallop. The yarnovers in the straight edge make little diamond or house shapes and the others are quite round, and I like seeing that difference close together in the same piece.

single scallop

Speaking of lacy edges! I tend not to pin out each yarnover loop, even though I think it might be The Done Thing. This is partly because I just don't own that many T-pins. (I have about 600, but there are more loops than that in most shawls I knit.) It is also partly because I am worried about breaking the yarn when I'm stretching a shawl out during blocking; I would rather pin through yarnovers a little way away from the edge of the knitting (or thread wires through there), because I tend to stretch the living daylights out of my knitting when I block it. It's also partly because I conceive of the lacy edge as a way of adding some give to the fabric and not as a decorative element; in my head it's more like lengthening the edge than it is like a tiny extra pattern. Really it just doesn't occur to me while I'm blocking a piece that I could pin out each loop.

Back to edgings: the scallopy one does have one unevenness that bothers me, and that's the extra stitch near the scalloped edge on the decreasing slope. (Look at the chart; rows 2-14 have two stitches between the yarnover closest to the left edge and the edge itself, and rows 16-26 have three.) That means that the decreasing slope is slightly thicker than the increasing slope, so the edging looks vaguely off-kilter. If I used this pattern to edge a project, that's something I would change, probably by shoving all the patterning beyond the faggoted edge beginning with row 16 over one stitch to the left (as charted).

The point lace edging—which I didn't knit, because I am sort of planning a project around it, so I'll get to it soon—is familiar to me; Sharon Miller calls the allover pattern it's based on "bird's eye", and it's mostly just a collection of abutted spider motifs. (It's not difficult once you get the hang of it, but it still looks ugly and off-putting in chart form.) The interesting thing about it is that since each spider takes a few rows to execute, the edging has a gentle curve to it instead of the usual pointiness. You could make a similar edging for a piece with bead motifs in it by substituting beads for some or all of the spiders.

The project I'm thinking about is a little bird's eye scarf with that curviness on each long edge, and maybe tiny picots on the cast-on and cast-off edges. I like scarves that you can make out of one 400m/50g skein of laceweight whatever, and I like pretty dainty edges on things, but I feel like narrow scarves are overwhelmed by having edgings affixed to them. This one would grow quite organically out of the allover pattern, and I think the effect would be lovely.

One last item! I have to respectfully disagree with Franklin on the subject of when to weave in ends. If you do it before blocking, any unevenness in your weaving-in will come out in the wash. I am all about solutions that result in neatness without my having to be neat.

Monday, March 15, 2010

Oyster mittens

I wanted a pair of mittens that were a little fussy but not too much, and a little chunkier than the colorwork mittens I had been knitting before but not too much. Then I found this Silk Garden colour (#269), which reminded me of an oyster shell, and I made some ripply mittens:

front and back

The yarn blooms and becomes a little glossier after washing, and I am pretty pleased with the effect. These are more or less standard mittens, with a feather and fan cuff and slightly modified feather and fan on the back of the hand. (The palms are plain.) If you want to make ripply mittens too, you can knock out a pair of them in a weekend with no trouble, and maybe in an evening if you have few distractions and a lot of TV to watch.

Gauge

20 stitches and 32 rounds to 4", in stocking stitch.


Finished size

8" in diameter, and 10.5" from cuff to tip. It's trivial to adjust the length; just make it longer or shorter while you're knitting. Silk Garden blooms enough after washing that I'd recommend sizing them up by switching to bigger needles; I made swatches at 18 stitches/4" that looked just as solid, and would make mittens that were just as warm (and bigger around). For mittens that are a little smaller around, try decreasing a few stitches on the palm side after you've finished the cuff: if you decreased four stitches, your mitten would be a little over 7" around. (Omit four k2togs on the palm side during the first round of decreasing for the mitten tip to accomodate the different stitch count.) Stop increasing for the thumb and put its stitches on hold earlier, too, after 15 or 13 stitches.


Skills required
Yarn and notions
  • 2 skeins Noro Silk Garden, colour #269 (I used 67 grams of yarn in total)
  • 4mm double-pointed needles, set of 5 (or some other configuration of needles for working in the round: you could also use a set of 4 dpns, two circular needles of the same size, or one long circular needle)
  • one stitch holder or oddment of yarn to hold thumb stitches
  • two stitch markers
  • a darning needle

Cuff pattern

Rounds 1 and 2: Knit.
Round 3: (K2tog twice, (yo, k1) three times, yo, k2tog twice) around.
Round 4: Purl.


Hand pattern

Rounds 1 and 2: Knit.
Round 3: *K2tog twice, (yo, k1) three times, yo, k2tog twice. Repeat from * once more.
Round 4: Knit.


Right mitten

Cuff.

Cast on 44 stitches. Join into the round, being careful not to twist stitches. Purl one round. Begin cuff pattern; work the four-round repeat six times in total. (You'll have seven purl ridges including the one immediately above the cast-on edge.)

ripply cuffs

Setting up the hand.

Work hand pattern across 22 stitches for the back of the hand, then knit the remaining 22 stitches for the palm. Work one four-round repeat of hand pattern.

cuff transition

Setting up the thumb.

Round 1: Work across the back of the hand as established. Then knit 2, place a marker, M1L, knit 1, M1R, place a second marker, and knit to the end of the round.
Round 2: Work across the back of the hand as established, and knit across all palm stitches.
Round 3: Work across the back of the hand as established, knit to the first marker, slip marker, M1L, knit to the next marker, M1R, slip marker, and knit to the end of the round.

Alternate working rounds 2 and 3 until there are 17 stitches between the markers.

Next round: Work across the back of the hand as established, knit to the first marker and remove it, slip the next 17 stitches onto a stitch holder or a scrap of yarn, cast on 1 stitch, remove the second marker, and knit to the end of the round.

thumb and gusset

Hand.

Work across the back of the hand as established, and knit all the palm stitches, on every round until the mitten is about an inch shorter than your desired finished length, ending on any plain knit round. (For my mittens, that's 9.5" from the cast-on edge, or 3.25" from where I put the thumb stitches on hold.)

Decreasing for the mitten tip.

Round 1: (K2tog, k2tog, k3, k2tog, k2tog) four times.
Rounds 2-4: Knit.
Round 5: (k2tog, k3tog, k2tog) four times.
Round 6: Knit.
Round 7: k2tog around.

Break yarn, run the end through all remaining stitches, and pull it tight.

mitten tip

Thumb.

Transfer the 17 held stitches to three double-pointed needles. Knit across, then pick up and knit 3 stitches across the gap and join for working in the round. (You'll have 20 stitches.)

Next round: Knit to last 3 stitches, sk2p. (Now you'll have 18 thumb stitches.)

Knit plain until the thumb is about a quarter inch shorter than the finished length you want. (I knitted until it was 2.25", measured from where I picked up stitches.)

Next round: K2tog around.
Next round: Knit.
Next round: K2tog to last stitch, knit 1.

Break yarn, run the end through all remaining stitches, and pull it tight.


Left mitten

Work Cuff and Setting up the hand sections as for right mitten. Set up the thumb as follows:

Round 1: Work across the back of the hand as established. Then knit to the last three stitches of the round, place a marker, M1L, knit 1, M1R, place a second marker, and knit to the end of the round.
Round 2: Work across the back of the hand as established, and knit across all palm stitches.
Round 3: Work across the back of the hand as established, knit to the first marker, slip marker, M1L, knit to the next marker, M1R, slip marker, and knit to the end of the round.

Alternate working rounds 2 and 3 until there are 17 stitches between the markers.

Next round: Work across the back of the hand as established, knit to the first marker and remove it, slip next 17 stitches onto a stitch holder or a scrap of yarn, cast on 1 stitch, remove the second marker, and knit to the end of the round.

Work hand, mitten tip, and thumb as for right mitten.


Finishing

Weave in all the ends and block lightly, by washing the mittens in lukewarm water, squeezing excess water out with a towel, laying them on a flat surface and patting them into a mitten shape, and leaving them to dry. (If you don't, your mittens will have a strange ridge up the middle, where the feather and fan decreases are concentrated.)

Cut off the woven-in ends after the mittens are dry.