Saturday, March 31, 2012

Pump up the jams, part II

Last time we spoke, a fruit-and-sugar mixture was chilling out in the fridge overnight. (I use "overnight" loosely: it's totally fine to wait two or three days if you don't have time to jam the next day.) Today involves less activity and more waiting around than last time, so gather your waiting-around materials (tea! knitting!) and clean jars, rings, and lids.

Canning materials

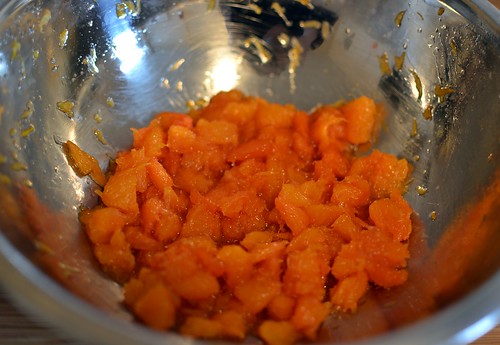
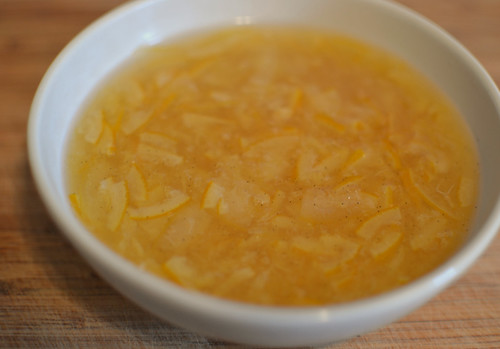
Some more liquid may have been drawn out of the fruit since last you saw it, but it doesn't undergo a dramatic transformation or anything. Fish out a piece and taste it and admire how it's gotten more tender and more intensely flavoured than it was fresh out of the orange.

Strained fruit

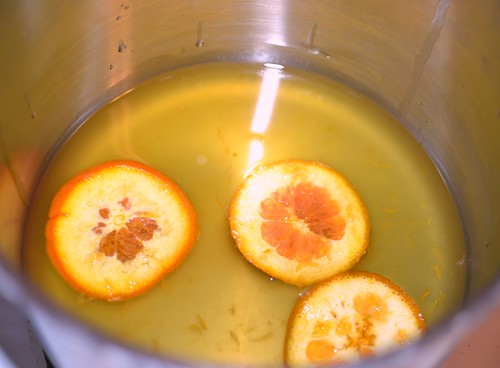
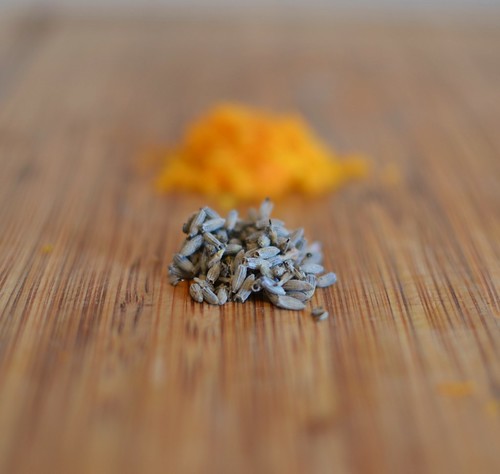
The liquid will be cooked separately from the fruit (to preserve the colour and texture and flavour of the fruit chunks), so strain out the fruit and pour the liquid into a pot. Put the big peel pieces in there, too, and the herb/spice/flower sachet if you'd like. (I thought my fruit was already sufficiently lavender-flavoured, so I left it out.) There may be little bits of flesh suspended in the liquid, but it doesn't matter because we're not making clear jelly here.

Orange sugar syrup

Bring the liquid to a boil and keep it there, stirring occasionally, until it's done, using one of these methods to identify its doneness.

One danger to be aware of is cooking the liquid for too long, past the gelling temperature of around 220F. If you've made candy before you may be familiar with the soft-ball stage, 235F, where a drop of sugar syrup dripped into cold water will form a ball that you can flatten between your fingers. If your jam-in-progress hits the soft-ball stage, it will be sticky and stiff and nigh unspreadable at room temperature, not really suitable for toast anymore. Keep a reasonably close eye on the boiling liquid—watch for the moment when the bubbles get slower and lazier, and start testing for doneness around then.

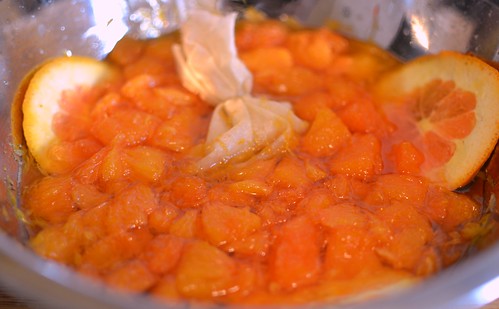
Once the liquid is done, remove the sachet and the peel bits. Eat these (well, not the sachet, but the peel bits) as soon as they are cool enough to touch, because they are delicious.

Candied peel

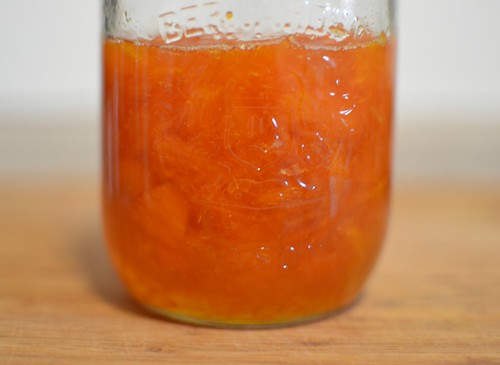
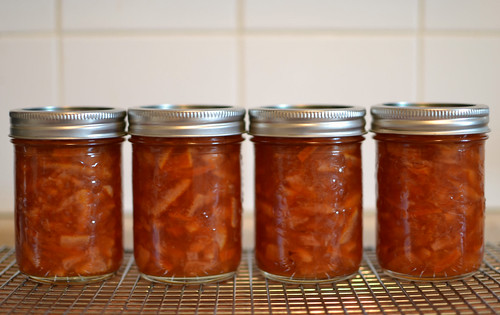
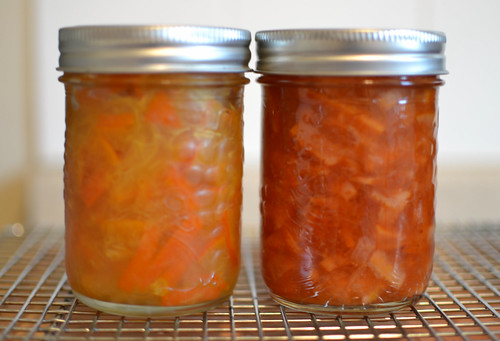
Add the reserved fruit pieces. Bring the mixture back to a boil and cook for five minutes. Transfer to sterilized jars and process in a boiling water bath. Or don't process them and keep them in the fridge until you eat all the jam, which may not take long.

Friday, March 30, 2012

Pump up the jams

Cara cara orange and lavender jam

The below is pretty representative of how I make jam nowadays, which is in small to very small batches, with spice or floral infusions, using volume ratios, cooking the fruit minimally, and stretching the process out over a couple of days. This orange business felt extravagantly wasteful after a month of marmalade—what do you mean I have to throw out the peel?—but the jam is delicious as all get-out so I hold no grudge.

I used four cara cara navels, which look like regular navel oranges outside but grapefruit on the inside. They smell floral and rich, a bit like blood oranges, and have a delicate flavour. The resultant jam would have filled one and a half 250mL jars if I had had any around, but instead it occupies a bit more than half of a 500mL jar. Any orange or tangerine that you like to eat out of hand will do if you want to jam with me.

The preparation for this jam is not really more involved than preparation for marmalade, but it is differently involved. Top and tail each orange and then supreme them—that is, cut off the skin to expose the flesh, then cut the flesh free from the membrane holding it together. You will be left with a pile of peel and some sea-creature-looking defleshed membrane...

Discard pile

...and a smaller pile of glistening nude citrus segments.

Supremes

Coarsely chop the supremes if you want, but don't exert too much energy on this; they will mostly fall apart during the cooking anyway, and you are free to mash them wholly or partially later if the texture isn't what you wanted. My four oranges yielded a cup and a bit of chopped flesh. Save a few scraps of peel and pith, too.

To intensify the orange flavour I cut the zest off of a few sections of peel, and minced it; this is optional but I recommend it. I had 1 tbsp of zest in total and my finished jam is pleasingly orange-tasting without being bitter at all.

Here is my highly scientific method for figuring out what if any spice to add to fruit preserves: take out a bunch of different whole spices and smell them together with the zest, one at a time, until a clear winner appears. I auditioned anise for the part (and may want to make orange-anise jam in the future, because wow) but eventually picked my old standby citrus enhancer, lavender. 1/2 tsp of dried lavender for a little over a cup of fruit creates a not especially floral finished jam; you can smell the lavender more than taste it, but it also makes the oranges taste more like themselves in a weird way. I recommend it (but still want orange and anise jam too) (and now that I think about it, orange and rose petals) (or orange and marigold).

Lavender and zest

Okay. Most of the first day's work is already finished, and no actual canning will be done today, but you will need a pot for the next few minutes. Measure the fruit as you add it to the pot; pour in any juice that collected on the cutting board, too. Add three-quarters of the volume of fruit in sugar, and the zest if you are using it. Bring the fruit and sugar to a boil, stirring briskly the whole time.

At first it will look like you forgot to add a crucial ingredient like water or something, but the heat and the sugar begin to draw liquid out of the oranges, and by the time the mixture reaches a boil it's quite liquidy indeed.

Ready to macerate

Take the pot off the heat and transfer the mixture to a bowl. Add whatever herb or spice or flower you settled on, tied up in a sachet. Also add the peel scraps you saved from earlier, pressing on everything to submerge it in the liquid. Cover the bowl with plastic wrap and put it in the fridge. That's it for today.

Wednesday, March 28, 2012

The cold light of day

I was very excited about the knee sock I started knitting on the weekend! A little too excited, as it turned out. The shaping that narrows the calf was slated to take place in ribbed panels at either side of the centre front panel, and there was going to be a neat-o cabled lattice thing that made those stitches disappear over about fifty rounds. My neat-o cabled lattice required six ktbl columns. I had six in one panel, but seven in the other, having knitted for eight inches without ever counting or double-checking that all was well. Sigh.

A fond farewell

Harsh light for a harsh reality. I unravelled the sock and wound the yarn back into its ball. Rather than restarting like a mature person, though, I put the yarn in time-out and tried something different with something else.

Red sock edging

This snippet of neatly biasing garter stitch edging is the cuff treatment for another prospective knee sock, but it too isn't working out. None of the patterns for the leg that I've auditioned so far have pleased me—not clingy enough, not stretchy enough, this-works-okay-but-won't-flow-into-any-other-pattern-neatly enough.

O my knitting, why are you all of a sudden so discouraging!

To salve my wounded crafter's ego, today I am starting a little batch of orange jam using these fine fellows.

Cara cara navels

Since my jam-making method (mostly informed by Christine Ferber's awesome book) differs from the marmalade procedure, I may tell you about it with pictures later in the week.

Sunday, March 25, 2012

Preoccupied

I devoted a lazy Sunday afternoon to the winter's last marmalade.

Meyer lemon and vanilla marmalade

This one is Meyer lemon and vanilla, which it looks like the whole internet was making a few years ago but I just got around to it now. Seven Meyer lemons, one regular ol' lemon, two-thirds of a vanilla bean, two and a half cups each of water and sugar, easy.

The last marmalade

I thought that a more delicate flavour deserved a more delicate preparation than I have used for my other bigger bolder marmalades this year, so these lemons got a slightly more exacting treatment than my Moros or Sevilles. I topped and tailed the fruit, sliced it into lengthwise eighths, cut out the pith from the centre of the fruit, cut away the exposed membranes between sections of flesh, and sliced it into wedges 1/16" thick.

Chopped lemons

The Epicurious recipe I linked above tells you to discard the lemon seeds, which is obviously a travesty—put them in a muslin bag and add them to the boiling fruit, because their pectin is very useful! Another thing it doesn't mention but I think is a good idea: instead of scraping the vanilla seeds directly into the pot, scrape them into about a quarter-cup of the sugar you'll be adding and rub it in thoroughly with your fingers. This is to ensure even distribution of seeds throughout the marmalade, no clumps allowed.

Tableau

The smaller pieces of fruit mean that this marmalade is more like slivers of peel suspended in lemon and vanilla jelly than chunks of peel held together by just-barely-enough jelly, as is my usual preference. It's good to have a variety of textures!

Marmalade leftovers

I feel like I'm further along the marmalade learning curve than I was at this time last year—now I am better at coaxing out the fullest flavours and preserving the fruit's bright colours. I can't decide whether my favourite is the bright yellow one from today or last week's coral-coloured one.

An embarrassment of riches

Today at my neighbourhood grocery store the cara cara oranges were cheap and plentiful, so I got a few. They are for bright pink jam though, not marmalade, so it's totally different.

Saturday, March 24, 2012

Moving along

I have pinned Wednesday's block to my kitchen corkboard and am deliberating about what to do with it. I am resolved to include it in something for the kitchen wall, but: will I make three more, sew them together, and add a border? it looks a lot like one-quarter of an urchin to me; should I paper piece some stars that look like this and this and this and assemble it into some sort of stylized sandbar scene? It feels nice to be in no rush.

It's pretty big

The pattern for my staid grey knitting has been released into the wild. I am pleased by some of its little unobtrusive features, like short-rowed extra ease in the corners...

Bottom point

... and knitted-on edging with cat's paw motifs centred underneath the bottom-most row of motifs in the shawl's body...

Bottom edge

... and a narrow edge treatment along the hypotenuse, so often neglected in top-down triangular shawls...

Top centre

... and those main pattern motifs, which look pleasingly angular when assembled into a grid.

Main pattern

I have named it Angharad because it is much beloved by me. Seriously, I am thrilled by today's wretched chilly gloom because it means I am justified in wearing a jacket with a shawl on top. Salient features: 900 yards of laceweight yarn (that's two skeins of the Stansborough Grey 2-ply I used) produces a shawl that measures 74" along the hypotenuse and 37" down the central spine after blocking. More or fewer repeats of the main pattern will yield a shawl that is bigger or smaller, as the final, slightly-different row of motifs flows out of the previous one no matter how many times it's been worked. I used 3.5mm needles to achieve a gauge of 20 sts and 24 rows = 4" in the main stitch pattern, again after blocking. The pattern is available for $6 CAD right here (or by clicking this direct-purchase link).

The purple and yellow mittens are nearly done (one is awaiting a tip and thumb; both need their ends woven in), and I am rewarding myself for my focus by, um, picking up something else.

Cuff

This is the top four inches of a new knee sock. I recently got some commercial wool over-the-knee socks and while they are perfectly fine and wearable, I am mildly scandalized by the fit and comfort that non-knitters have to sacrifice in order to be wool-clad from head to foot. There are toe seams! The cuff ribbing is fake, produced by elastic woven through the stockinette stitches on the wrong side! There's no calf shaping, let alone calf shaping exactly where you want it for your particular leg! Goodness gracious me. So I am lashing out by knitting knee socks with stretchy but non-binding sideways cuff edging and clingy twisted rib panels at either side that will narrow to nothing in an interlocking cabled pattern and totally different lace things stretching over the instep and over the centre back of the leg and heel flap. (Pictured above at left is the panel at the centre back leg that will extend to the bottom of the heel flap.)

My middle name is Overkill, in case you were wondering.

Tuesday, March 20, 2012

Tuesday timidity

Gathering the temerity to cut into these.

A well-curated FQ collection

The fabrics at either end are my favourites together, because the textural contrast is fabulous. (Visually yes, but even more so to touch.)

Linen and lawn

Monday, March 19, 2012

The Marmalade Diaries, Episode 2

Four blood oranges and one lemon became this fabulous concoction:

Mmmmmarmalade

I think this was the right ratio of orange : lemon to get a marmalade that set up nicely without needing to supplement with extra pectin. The blood oranges were relatively thin-skinned and totally seedless, so I was a bit concerned. But I needn't have been.

The leftovers

The flavour is nicer than I anticipated in my wildest dreams—it smells tart (lemony!), tastes faintly bitter at the beginning (pithy!) and then a little sweet and floral (moro-y!), and you can taste the cardamom at the very end (spicy!), like a little sensual odyssey that repeats in every mouthful. (I am not sorry if this is a weird metaphor.)

The colour was a lot of fun to watch. After the chopped fruit had sat around in the fridge for a few days, it looked like this:

Post-soaking

Boiling with sugar made it deepen to a darker and less-pink coral. But it's still decidedly less orange than the Seville orange marmalade from the other week.

Comparison

In conclusion, I am glad I have a whole litre of it and I am not intending to share and next year I will make more of the exact same thing.

Friday, March 16, 2012

Sweet tooth

I am blocking my rather staid grey knitting this afternoon. This is some short-rowed corner shaping that gave me significant grief until I sorted it out.

Corner shaping

It is a small detail but it made me feel like a wizard of some kind: the narrow edging along the hypotenuse is knitted simultaneously with the body of the shawl and the wider edging is knitted on afterward, but I wanted it to grow out of the narrower edging without distorting the straight line along the top of the shawl. Looking at the completed corner, though, you can't see any hassle there at all, which I think is a sign of a feat accomplished.

ETA: Unpinned and wrapped around my shoulders, it's possible that I will never take it off. Well, maybe sometime I will weave in the ends. But not now.

A woeful affliction

I have a little assortment of brightly-coloured options to switch off between for the rest of the weekend. One is a newly-started mitten, a sibling of this pair.

Fishtail cuff

I learned this cuff treatment from Nancy Bush's Folk Knitting in Estonia, and it's very entertaining to knit—it looks like a horrible mistake at first! you will scowl at your knitting in doubt! but persevere and you will be rewarded!—and it's useful, too; it pulls in the cuff nicely and has a lot of stretch and the bias means it's disinclined to curl. A winner all around. This is the left mitten so the cuff is spiralling to the left, but the right cuff will spiral in the opposite direction.

Negatives

The back of the hand has a 9 st x 9 rnd square motif repeated over and over, switching the colours around each time to yield a busy checkerboard result.

Palm

The palm has a smaller repeating pattern motif given the same treatment. (The charted motif by itself looks hilariously unlike the knitted-up version!)

Frothy pink confection

And when I get tired of stranded colourwork on 2mm needles, I can swap it out for bigger and lace: this is the humble beginning of a bottom-up triangle that will eventually have an edging applied all the way around. It's only been about three minutes but I am a pretty big fan so far.

Tuesday, March 13, 2012

It is complicated

It is complicated

An artist whose work means a lot to me has died, so this afternoon I spent some introvert time on the couch making a little sampler out of their words, some tiny motifs, and a lot of white space.

Axes 2–5

(The text is axes 2–5 by Mark Aguhar—may they rest in peace on a bed of glitter.)

Monday, March 12, 2012

Perenelle

I had a mysteriously sleepless night last night and yet seem to be running on all cylinders! It is possible that later there will be some sort of crash and burn episode followed by a nap on the couch! But in the meantime I am bright-eyed and bushy-tailed and a little more exclamatory than usual!

There's a new pair of mittens in my pattern arsenal if you are interested at this mitten-inappropriate time of year. I've had the sample languishing mostly finished for kind of a while now, owing I think to a lack of weaving-in-ends mojo, but now they're properly finished and I am quite tickled by them.

Cuffs

The cuff treatment is only about an inch deep, but it is effectively an inch of stranded garter stitch, so it stabilizes the edge very effectively.

Cuffs and palms

I was so excited about the checkerboard grid thing going on at the wrist and on the back of the hand that I knitted the palms in a smaller version, with squares three stitches wide by three rounds tall rather than nine by nine. The palms are a little dizzying to look at, actually.

Palmistry

This morning I successfully wore them out of the house and didn't regret it, but only because it was still a bit chilly out at 6am. I regret that it's due to be warm all week; where will I wear my mittens?

Hand-holdy

Salient details: I used two 3 ply yarns from Sunday Knits, purveyor of different blends that knit up at the same gauge for a little extra textural oomph. The yellow is Angelic (75% merino, 25% angora) in Dijon; the navy is Eden (100% merino) in Night. My gauge here is 38 stitches and 41 rows to 4", so the mittens are not insubstantial-feeling for all that they are lightweight. The lengths of the hand and the thumb are easy to adjust by small increments on the fly; the circumference is most easily adjusted by tweaking the gauge. At 9½ stitches to the inch my mittens measure 7½" around, but the fabric is marvellously stretchy and pliable; a mitten fits me comfortably with no ease. I named them "Perenelle" because this series has got me thinking about Awesome Lady Alchemists Of The Past.

They've got a pattern page on ravelry over here; you can buy the pattern PDF for $6 CAD without needing to log in by clicking this here link.

Sunday, March 11, 2012

Moromalade

I'm spending the first day of extra evening light coasting through the last few feet of this edging:

Grey edging

And plotting this year's second marmalade:

Blood oranges and cardamom

Blood oranges are so sweet and floral-tasting already, they don't really need any extra flower power. So I am going the cardamom route instead. The uncut oranges and cardamom pods smell magnificent together, so I'm looking forward to finding out how the combination tastes.

Friday, March 9, 2012

Lavender menace

The weather today is alternating bright sunshine and blowing snow (and occasionally both together). It must be spring!


Tomorrow evening a friend is hosting a get-together for which I want to femme up a little. I didn't have an outfit-coordinating clutch or handbag of any type, though, so I pulled out a bunch of fabrics and arranged them into pairs until an appropriate combination jumped out at me.

Gathered bag

I know it's a few years old, but this tutorial remains useful and adorable, and it's a pretty good way to produce a charming result from two fat quarters and some interfacing scraps and nothing else. I think it took longer to pick out fabric than it did to make the bag.

The handles are interfaced strips of fabric folded into quarters lengthwise, so they are quite stiff and solid (though not uncomfortable to hold).

Handles

The lining fabric is a Nani Iro Fuccra double gauze fat quarter I'd been saving for a rainy day.

Gaping maw

I cut the shell/lining rectangles to 9.5" x 12", to make a slightly narrower and deeper bag than the instructions produce. The finished bag is the right size for my wallet/keys/lipstick/powder/phone, or two 50g balls of yarn in coordinating colours.

Colour-coordinated knitting